Sitecore 5.1.1 introduced support for Proxy Items. This article describes this new feature.
1. What is a Proxy Item?
Proxy n. A person authorized to act for
another; an agent or substitute.
A Proxy Item acts as if it were another Item. When proxies are enabled, a Proxy Item returns the Item it references rather than itself. By default, the Proxy Item will also return the target item's children, which are referred to as Shadow Items. Both Proxy Items and Shadow Items are referred to as Virtual Items.
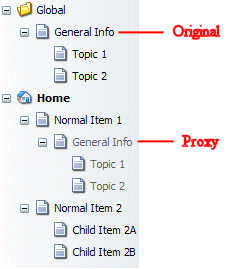 Virtual Items are
displayed in the Content Editor content hierarchy with grey text, as shown
in the image to the right.
Proxy Items make it possible to show an Item (and potentially its children) in multiple places within the Sitecore content structure without copying the Item. Changes to Proxy Item are reflected immediately in the original Item. Even deletion of children works on the original child.
There are only two exceptions to this rule of redirection:
- When copying or moving a Proxy Item, it is the Proxy Item itself which is copied or moved. The original Item is not affected.
- When deleting the Proxy Item (the root of a tree of Virtual Items), only the Proxy Item is deleted, not the original Item.
2. Proxy Template
A Proxy Item is just a normal Sitecore Item which is based on the Sitecore Proxy Template. The Proxy Template includes fields which configure how the proxy works. These include:
- Target Item – the ID of the Item that the Proxy Item represents
- Target Database – blank if the target Item is in the host database, otherwise, the database name (in all lower case letters)
- Exclude Children – indicates that the represented Item’s children should not be shown
Note that, since only Administrators may create Items based on a Template, only Administrators may create Proxy Items.
3. Creating a Proxy Item
This section describes the steps required to create Proxy Items.
-
Log in to the Sitecore Desktop client as an Administrator user.
-
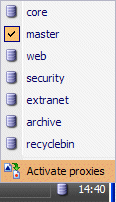
Select the Database icon on the Taskbar (in the lower right hand corner
of the Desktop) and select the Deactivate Proxies selection.
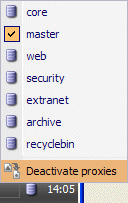
One must deactivate proxies when creating new Proxy Items. This makes it possible to see the Proxy Item fields, which the Content Editor otherwise does not display.
NOTE: Choosing Deactivate proxies will close all applications in the Sitecore Desktop client.
-
Open the Content Editor.
-
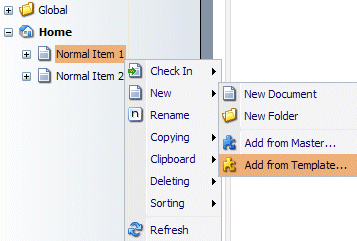
Locate the Parent Item for the desired Proxy Item. Right click on
the Item and select the New » Add from Template… popup menu command.
-
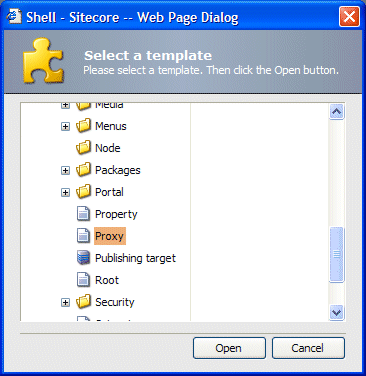
Select the System » Proxy Template and then select the Open button.
-
Provide a name for the Proxy Item.
-
Specify values for the Proxy Item fields. In the simplest case,
when linking to an Item in the Master database, simply select the desired
Item from the Target Item field’s drop list.
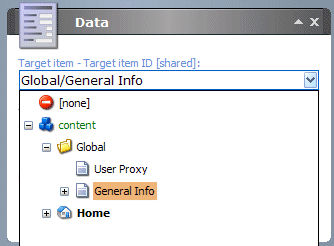
If you want to reference an Item in another database, please follow the steps in the Referencing Other Databases section.
-
Select the Activate proxies command to reactivate proxies in the client.
-
Open the Content Editor to view the Proxy Item(s).

4. Referencing Other Databases
The Sitecore Proxy Template defines the data type of Target Item field as Reference. This is convenient when linking to Items in the Master database, as Reference fields display the Master database content tree. The Reference field cannot be used, however, to select Items in any database other than the Master database. If you want to reference an Item in a different database, you must follow the steps included in this section.
- Switch to the desired target database using the Desktop Database icon (also used for deactivating and activating proxies).
- Locate the desired Item in the Content Editor.
- Copy the desired Target Item’s ID from the System section.
- Switch back to the Master database.
- Edit the Proxy Template in the Template Editor
- Change the Target Item field’s data type to Text.
- Save the Proxy Template.
- Follow the procedure described in Creating a Proxy Item. Rather than select the Target Item from the field’s drop down tree, paste the Item ID in the Target Item text field. Provide the name of the database in the Target Database field (in all lower case letters). Reactivate proxies as described in the Creating a Proxy Item section.
5. Required Configuration
By default, only the Master database is configured to work with Proxy Items. To enable Proxy Items in another databases, the database definition must include a "shadow database".
For example, if you want to create Proxy Items directly to your Web database, you must add the following to the Web database definition in the web.config file:
<shadowProvider
type="Sitecore.Data.$(database).$(database)ShadowProvider,
Sitecore.$(database)">
<param desc="connection"
ref="connections/$(id)"></param>
</shadowProvider>
6. Proxy Items in the API
When accessing Items via the Sitecore API, the Item.ID property of Proxy Items will contain the ID of the Target Item. To access the ID of the Proxy Item itself, use:
Item.InnerData.Definition.ID
The RuntimeSettings object includes some properties associated with using Proxy Items (these settings only apply when Proxies are activated):
-
Item.RuntimeSettings.IsShadow:
Indicates whether the Item is a Shadow Item (that is, an Item which is included via a Proxy)
-
Item.RuntimeSettings.IsProxy:
Indicates whether the Item is a Proxy Item (that is, the root of a shadow tree)
-
Item.RuntimeSettings.IsVirtual:
Indicates whether the Item is either a Shadow or a Proxy Item
-
Item.RuntimeSettings.IsExternal:
Indicates whether the Item is from a database other than the host database
-
Item.RuntimeSettings.OwnerDatabase:
The database that owns the Target Item. Note the Item.Database property will always return the host database!